How To Set Up Co.CC Domain hosting For Blogger


CO.CC:Free DomainAs Kang Rohman promised before, Kang Rohman would discuss about how to set up the Co.CC domain for blogger. To do it is easy; you only need to do setting at the dashboard Co.CC. However, need to know that Kang Rohman suggest you to change your blogspot with Co.CC for your new blogspot blog, not for your old blog, why so? Because if you do the change to your old blogspot, whether with domain of Co.CC, .com, .net or anything else, your blog will be consider as the new blog.
I mean, what you have built to your old blog will be in vain and useless, for instance, the backlinks, your registration to several websites for the improvement of your blog, and more. You should start it again from the beginning or do the change to your registration setting. Therefore, Kang Rohman suggests you to change the blogspot domain only to your new blog. However, if you think you should do that due to any reason and consideration, just go on.
Well, let’s get our point, below is how to set up or change blogspot domain with Co.CC:
  1. Click here if you have not yet had your Co.CC domain. Please register first if you haven’t has your own account.
  2. After you have your account, please sign in to www.co.cc with your account.  image
  3. Click the Getting A New Domain tab (with assumption that you haven’t had your domain name). image
  4. Type the domain name you want, click the Check availability button to check the availability of your domain name, repeat if unavailable.
    image
  5. If the domain name is available, click Continue to registration button as the screenshot below image image
  6. Congratulations, you now have your own domain name of Co.CC. To be noted, you haven’t managed the setting to your new domain.
In order to do setting to your new domain of Co.CC you can follow these steps below:
  1. As usual, you sign in first with your account, then click Domain Settings as you see at the screenshot below
     image
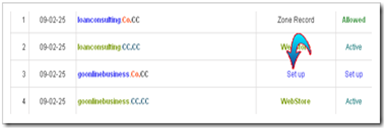
  2. Click Set up at your new domain name as seen at the screenshot below, then it will appear the wordsPlease domain setup now as the notification that your new domain name of Co.CC has not been set up. 
    image
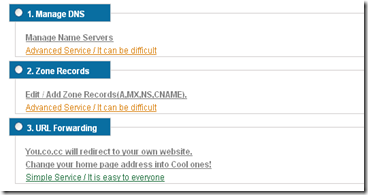
  3. Click the words Please domain setup now to set up your new domain name of Co.CC. On this page, you will choose one of the three domain setup as Manage DNS, Zone Record, and URL Forwarding. For those who want to change the blogspot domain name with Co.CC, you should choose the Zone Record by click it or its radio button.
    3zone
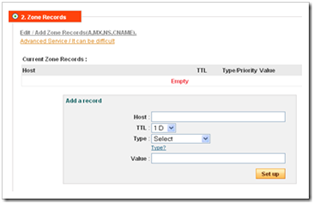
  4. After you choose Zone Record, there will appear the setting option as the screenshot below
    image
    At the dialogue box, fill the Host with your domain name of Co.CC, e.g. www.loanconsulting.Co.CC(the Host name of my Co.CC domain). Then at TTL let it as 1D, for Type, choose CNAME, and Valuefill with ghs.google.com.  After all fields are filled out, click the Set up button. You can see the example of my setting as the screenshot below image
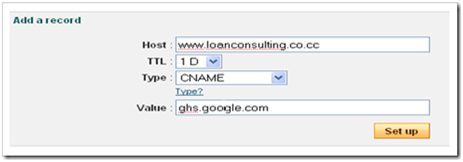
  5. Now you finish setting your new Co.CC domain, but usually you have to wait for about 48 hours until your new domain is active.
Well, now it’s time to change the blogspot domain with Co.CC domain. Please follow the steps below:
  1. Log in to blogger with your account.
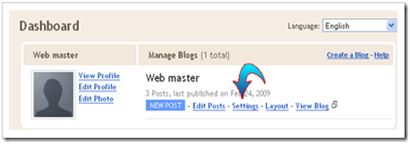
  2. Click Settings at the dashboard
    image
  3. At the Settings page, click Publishing
    image
  4. When you are at the Publishing page, click Custom Domain
    image
  5. At the page of Publishing on custom domain, you are not asked to buy the domain (except you want it), but we will use the blogspot domain that we have made, then click Switch to advanced settings to change your blogspot domain with Co.CC domain.
    clickswitch
  6. At the page of Advanced Settings fill with your Co.CC domain at the field of Your Domain e.g.www.loanconsulting.Co.CC (it’s my Co.CC domain). The for Use a missing files host? Leave it asNo and at the field of Word Verification fill with the words that appear with blur (colored and unclear). After all fields are filled out, click Save Settings.
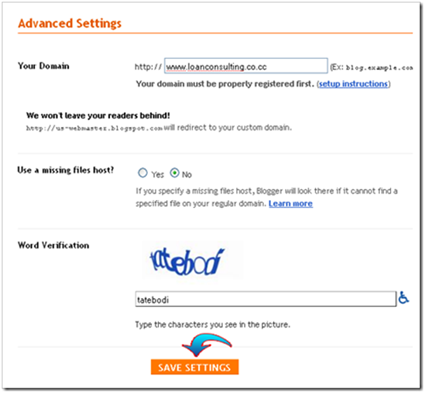
    image
  7. Be sure that Save Setting at Point 6 is successful with the sign as the words Settings Were Saved Successfully at upper right of the page
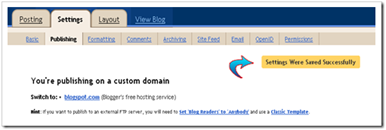
    image
  8. You have finished changing your blogspot domain with Co.CC domain.
Note: usually you have to wait for about 48 hours until your new domain is active as Co.CC regulation.
If you are interested in changing your blogspot domain with Co.CC domain, happy trying and good luck.

Make Free Dollars From Co.CC


moneyIn the previous post, Kang Rohman posted about Free Domain from Co.CC. In the post, Kang Rohman promised to explain how to set up domain Co.CC for blogger, but before that, Kang Rohman would like to share information about how to get free dollar from Co.Cc.
There are two benefits we can get from Co.CC, the first you can get more than one free domain, and the second you can get free dollars by joining the Co.CC referral program. You will be paid $0.1 each time new referral joins through you. The payment can be delivered via Paypal.
Will you get the loss by joining this program? Not at all. In Kang Rohman’s opinion, you won’t get the loss, but in the contrary, you will get the benefits and profits because Co.CC doesn’t ask a payment from you. You only need to place link or banner from Co.CC (with your referral link code) on your blog or website, and then let Dollars flow to your Paypalclip_image001.
So what keeps you waiting? Register yourself to Co.CC; click the banner below to join.
cocc
For those who have not yet had Paypal account, you can register freely as well; click the banner below to get your free account of Paypal.
 paypal
Happy hunting free dollars from Co.CC
Notes: You have no obligatory to use Co.CC domain for your blog, you can use it for any web. If you want to get your Paypal account but you don’t have credit card to verify, you can use Virtual Credit Card, to get this, just do googling.

4 new translator widget style for blogger & website


1.Log in to your dashboard--> layout- -> Edit HTML


2.Click on "Expand Widget Templates"


3.Scroll down to where you see this:


<data:post.body/>


4.Copy below code and paste it immediately after the line <data:post.body/>


<div id="translator_20027"><noscript>Javascript est desactiv&eacute; - <a href="http://www.supportduweb.com/">Support du web</a> - <a href="http://www.supportduweb.com/generateur-boutons-traduction-translation-google-gratuit-html-code=script-boutons-traduire-page-web.html">Boutons Traduction enligne site web</a></noscript></div><script type="text/javascript" src="http://services.supportduweb.com/translator/20027-1-yyyyyyyyy.js"></script>


style 2           


<div id="translator_41552"><noscript>Javascript est desactiv&eacute; - <a href="http://www.supportduweb.com/">Support du web</a> - <a href="http://www.supportduweb.com/generateur-boutons-traduction-translation-google-gratuit-html-code=script-boutons-traduire-page-web.html">Boutons Traduction enligne site web</a></noscript></div><script type="text/javascript" src="http://services.supportduweb.com/translator/41552-2-yyyyyyyyy.js"></script>


style 3              


<div id="translator_38715"><noscript>Javascript est desactiv&eacute; - <a href="http://www.supportduweb.com/">Support du web</a> - <a href="http://www.supportduweb.com/generateur-boutons-traduction-translation-google-gratuit-html-code=script-boutons-traduire-page-web.html">Boutons Traduction enligne site web</a></noscript></div><script type="text/javascript" src="http://services.supportduweb.com/translator/38715-3-yyyyyyyyy.js"></script>


style 4               


<div id="translator_63473"><noscript>Javascript est desactiv&eacute; - <a href="http://www.supportduweb.com/">Support du web</a> - <a href="http://www.supportduweb.com/generateur-boutons-traduction-translation-google-gratuit-html-code=script-boutons-traduire-page-web.html">Boutons Traduction enligne site web</a></noscript></div><script type="text/javascript" src="http://services.supportduweb.com/translator/63473-4-yyyyyyyyy.js"></script>


5.Click on "Save Templates" and now you are done.


demo:


How To add Youtube Subscribe Widget on Blogger


2. Copy and paste this code below in it :


<iframe src=http://www.youtube.com/subscribe_widget?p=YOURCHANNEL NAME style="overflow: hidden; height: 105px; width: 300px; border: 0;" scrolling="no" frameBorder="0"></iframe>


3. Save and DONE!


Customization

You can change the height & width edit the code in red.
And, the widget will look something like this.


Add Sharing is Sexy Social Bookmarking Widget in Blogger

Social Bookmarking is one of the smart ways to increase traffic on your blog.In order to attract your readers to bookmark and share your posts,attractive and sexy social bookmarking icons are must.Now i will tell you how you can add sexy share the love social bookmarking widget to your blogger blog.These icons use the magic of jquery and show up on mouse hover.When mouse move away from icons they auto hide.To see how it works you can see the demo below.You can see the widget below the blog posts.
Installation
Go to Layout > Edit HTML from your blogger Dashboard select Expand Widget Templates.Insert the below code before </head>.
<style type=’text/css’>
div.sexy-bookmarks {
height:54px;
background:url(&#39;http://i43.tinypic.com/2ueii3t.png&#39;) no-repeat left bottom;
position:relative;
width:540px;
}
div.sexy-bookmarks span.sexy-rightside {
width:17px;
height:54px;
background:url(&#39;http://i43.tinypic.com/2ueii3t.png&#39;) no-repeat right bottom;
position:absolute;
right:-17px;
}
div.sexy-bookmarks ul.socials {
margin:0 !important;
padding:0 !important;
position:absolute;
bottom:0;
left:10px;
}
div.sexy-bookmarks ul.socials li {
display:inline-block !important;
float:left !important;
list-style-type:none !important;
margin:0 !important;
height:29px !important;
width:48px !important;
cursor:pointer !important;
padding:0 !important;
}
div.sexy-bookmarks ul.socials a {
display:block !important;
width:48px !important;
height:29px !important;
font-size:0 !important;
color:transparent !important;
}
.sexy-furl, .sexy-furl:hover, .sexy-digg, .sexy-digg:hover, .sexy-reddit, .sexy-reddit:hover, .sexy-stumble, .sexy-stumble:hover, .sexy-delicious, .sexy-delicious:hover, .sexy-yahoo, .sexy-yahoo:hover, .sexy-blinklist, .sexy-blinklist:hover, .sexy-technorati, .sexy-technorati:hover, .sexy-facebook, .sexy-facebook:hover, .sexy-twitter, .sexy-twitter:hover, .sexy-myspace, .sexy-myspace:hover, .sexy-mixx, .sexy-mixx:hover, .sexy-script-style, .sexy-script-style:hover, .sexy-designfloat, .sexy-designfloat:hover, .sexy-syndicate, .sexy-syndicate:hover, .sexy-email, .sexy-email:hover {
background:url(&#39;http://i44.tinypic.com/1znbj83.png%27&#39;) no-repeat !important;
}
.sexy-furl {
background-position:-300px top !important;
}
.sexy-furl:hover {
background-position:-300px bottom !important;
}
.sexy-digg {
background-position:-500px top !important;
}
.sexy-digg:hover {
background-position:-500px bottom !important;
}
.sexy-reddit {
background-position:-100px top !important;
}
.sexy-reddit:hover {
background-position:-100px bottom !important;
}
.sexy-stumble {
background-position:-50px top !important;
}
.sexy-stumble:hover {
background-position:-50px bottom !important;
}
.sexy-delicious {
background-position:left top !important;
}
.sexy-delicious:hover {
background-position:left bottom !important;
}
.sexy-yahoo {
background-position:-650px top !important;
}
.sexy-yahoo:hover {
background-position:-650px bottom !important;
}
.sexy-blinklist {
background-position:-600px top !important;
}
.sexy-blinklist:hover {
background-position:-600px bottom !important;
}
.sexy-technorati {
background-position:-700px top !important;
}
.sexy-technorati:hover {
background-position:-700px bottom !important;
}
.sexy-myspace {
background-position:-200px top !important;
}
.sexy-myspace:hover {
background-position:-200px bottom !important;
}
.sexy-twitter {
background-position:-350px top !important;
}
.sexy-twitter:hover {
background-position:-350px bottom !important;
}
.sexy-facebook {
background-position:-450px top !important;
}
.sexy-facebook:hover {
background-position:-450px bottom !important;
}
.sexy-mixx {
background-position:-250px top !important;
}
.sexy-mixx:hover {
background-position:-250px bottom !important;
}
.sexy-script-style {
background-position:-400px top !important;
}
.sexy-script-style:hover {
background-position:-400px bottom !important;
}
.sexy-designfloat {
background-position:-550px top !important;
}
.sexy-designfloat:hover {
background-position:-550px bottom !important;
}
.sexy-syndicate {
background-position:-150px top !important;
}
.sexy-syndicate:hover {
background-position:-150px bottom !important;
}
.sexy-email {
background-position:-753px top !important;
}
.sexy-email:hover {
background-position:-753px bottom !important;
}
</style>
Now search for <data:post.body/> and insert below code after it.
<div class=’sexy-bookmarks’>
<ul class=’socials’>
<li class=’sexy-delicious’><a expr:href=’&quot;http://del.icio.us/post?url=&quot; + data:post.url + &quot;&amp;title=&quot; + data:post.title’ target=’_blank’/></li>
<li class=’sexy-digg’><a expr:href=’&quot; http://digg.com/submit?url=&quot; + data:post.url + &quot;&amp;title=&quot; + data:post.title’ target=’_blank’/></li>
<li class=’sexy-technorati’><a expr:href=’&quot; http://technorati.com/faves?add=&quot; + data:post.url + &quot;&amp;title=&quot; + data:post.title’ target=’_blank’/></li>
<li class=’sexy-reddit’><a expr:href=’&quot; http://www.reddit.com/submit?url=&quot; + data:post.url + &quot;&amp;title=&quot; + data:post.title’ target=’_blank’/></li>
<li class=’sexy-stumble’><a expr:href=’&quot; http://www.stumbleupon.com/submit?url=&quot; + data:post.url + &quot;&amp;title=&quot; + data:post.title’ target=’_blank’/></li>
<li class=’sexy-designfloat’><a expr:href=’&quot;http://www.designfloat.com/submit.php?url=&quot; + data:post.url + &quot;&amp;title=&quot; + data:post.title’ target=’_blank’/></li>
<li class=’sexy-facebook’><a expr:href=’&quot; http://www.facebook.com/sharer.php?u=&quot; + data:post.url + &quot;&amp;title=&quot; + data:post.title’ target=’_blank’/></li>
<li class=’sexy-twitter’><a expr:href=’&quot; http://twitthis.com/twit?url=&quot; + data:post.url + &quot;&amp;title=&quot; + data:post.title’ target=’_blank’/></li>
<li class=’sexy-furl’><a expr:href=’&quot; http://www.furl.net/storeIt.jsp?u=&quot; + data:post.url + &quot;&amp;title=&quot; + data:post.title’ target=’_blank’/></li>
<li class=’sexy-syndicate’><a href=’ADD YOUR FEEDBURNER FEED URL HERE’ title=’Subscribe to RSS’/></li>
<li class=’sexy-email’><a expr:href=’&quot; mailto:?subject=&quot; + data:post.url + &quot;&amp;title=&quot; + data:post.title’ target=’_blank’/></li>
</ul>
<span class=’sexy-rightside’/></div>
<div class=’sexy-link’> Distributed by <a href=’http://www.bloggertemp.com/’ title=’Blogger widgets’>Blogger Widgets </a>
</div>
The installation part is finished.I hope you will love this widget.If there is any problem in implementing this widget please do tell me.

add related post widget to blogger


This widget is totally free for all platforms including Wordpress, blogger, Typepad etc there is no signup required to get this widget it takes a minute and having few easy step to running on your blog.

The steps below

1. Go to LinkWithin website.

2. Fill the form place on the right hand of the site by putting your Email address, Blog link, choose platform and number of stories you want to add. User can check the box according to condition.


3. Click on the "Get Widget!".

If you choose Google blogger blog a page on "install widget on blogger" will pop up. Then follow the instruction to get or install the widget on your blog.

Finally you see linkwithin widget installed on your blog pos
Related Posts Plugin for WordPress, Blogger...