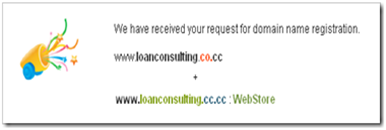
Affichage des articles dont le libellé est free domain. Afficher tous les articles

How To Set Up Co.CC Domain hosting For Blogger


CO.CC:Free DomainAs Kang Rohman promised before, Kang Rohman would discuss about how to set up the Co.CC domain for blogger. To do it is easy; you only need to do setting at the dashboard Co.CC. However, need to know that Kang Rohman suggest you to change your blogspot with Co.CC for your new blogspot blog, not for your old blog, why so? Because if you do the change to your old blogspot, whether with domain of Co.CC, .com, .net or anything else, your blog will be consider as the new blog.
I mean, what you have built to your old blog will be in vain and useless, for instance, the backlinks, your registration to several websites for the improvement of your blog, and more. You should start it again from the beginning or do the change to your registration setting. Therefore, Kang Rohman suggests you to change the blogspot domain only to your new blog. However, if you think you should do that due to any reason and consideration, just go on.
Well, let’s get our point, below is how to set up or change blogspot domain with Co.CC:
  1. Click here if you have not yet had your Co.CC domain. Please register first if you haven’t has your own account.
  2. After you have your account, please sign in to www.co.cc with your account.  image
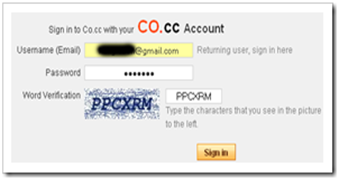
  3. Click the Getting A New Domain tab (with assumption that you haven’t had your domain name). image

  4. Type the domain name you want, click the Check availability button to check the availability of your domain name, repeat if unavailable.
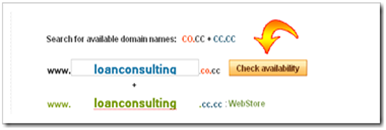
    image
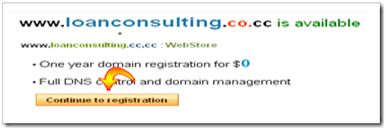
  5. If the domain name is available, click Continue to registration button as the screenshot below image image
  6. Congratulations, you now have your own domain name of Co.CC. To be noted, you haven’t managed the setting to your new domain.
In order to do setting to your new domain of Co.CC you can follow these steps below:
  1. As usual, you sign in first with your account, then click Domain Settings as you see at the screenshot below

     image
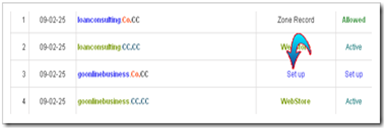
  2. Click Set up at your new domain name as seen at the screenshot below, then it will appear the wordsPlease domain setup now as the notification that your new domain name of Co.CC has not been set up. 
    image
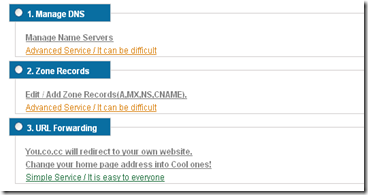
  3. Click the words Please domain setup now to set up your new domain name of Co.CC. On this page, you will choose one of the three domain setup as Manage DNS, Zone Record, and URL Forwarding. For those who want to change the blogspot domain name with Co.CC, you should choose the Zone Record by click it or its radio button.
    3zone
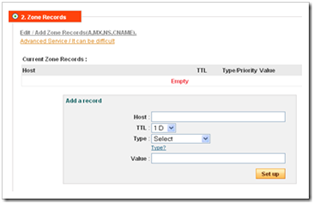
  4. After you choose Zone Record, there will appear the setting option as the screenshot below
    image
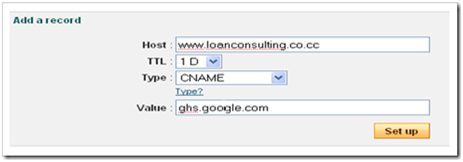
    At the dialogue box, fill the Host with your domain name of Co.CC, e.g. www.loanconsulting.Co.CC(the Host name of my Co.CC domain). Then at TTL let it as 1D, for Type, choose CNAME, and Valuefill with ghs.google.com.  After all fields are filled out, click the Set up button. You can see the example of my setting as the screenshot below image
  5. Now you finish setting your new Co.CC domain, but usually you have to wait for about 48 hours until your new domain is active.
Well, now it’s time to change the blogspot domain with Co.CC domain. Please follow the steps below:
  1. Log in to blogger with your account.
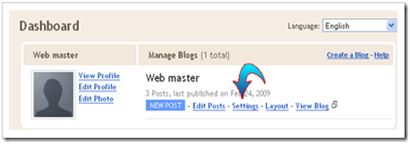
  2. Click Settings at the dashboard
    image
  3. At the Settings page, click Publishing
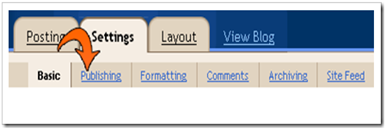
    image
  4. When you are at the Publishing page, click Custom Domain
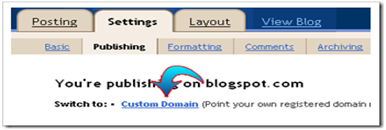
    image
  5. At the page of Publishing on custom domain, you are not asked to buy the domain (except you want it), but we will use the blogspot domain that we have made, then click Switch to advanced settings to change your blogspot domain with Co.CC domain.
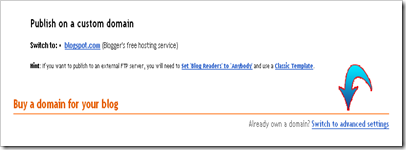
    clickswitch
  6. At the page of Advanced Settings fill with your Co.CC domain at the field of Your Domain e.g.www.loanconsulting.Co.CC (it’s my Co.CC domain). The for Use a missing files host? Leave it asNo and at the field of Word Verification fill with the words that appear with blur (colored and unclear). After all fields are filled out, click Save Settings.
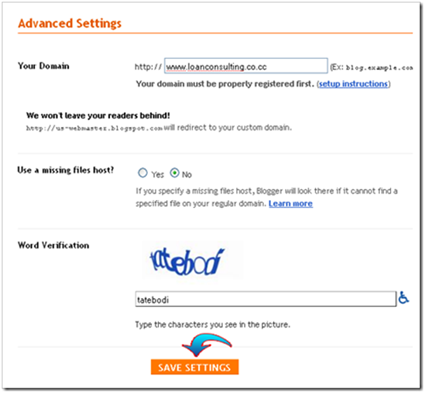
    image
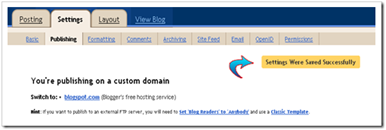
  7. Be sure that Save Setting at Point 6 is successful with the sign as the words Settings Were Saved Successfully at upper right of the page
    image
  8. You have finished changing your blogspot domain with Co.CC domain.
Note: usually you have to wait for about 48 hours until your new domain is active as Co.CC regulation.
If you are interested in changing your blogspot domain with Co.CC domain, happy trying and good luck.
Make Free Dollars From Co.CC


moneyIn the previous post, Kang Rohman posted about Free Domain from Co.CC. In the post, Kang Rohman promised to explain how to set up domain Co.CC for blogger, but before that, Kang Rohman would like to share information about how to get free dollar from Co.Cc.
There are two benefits we can get from Co.CC, the first you can get more than one free domain, and the second you can get free dollars by joining the Co.CC referral program. You will be paid $0.1 each time new referral joins through you. The payment can be delivered via Paypal.
Will you get the loss by joining this program? Not at all. In Kang Rohman’s opinion, you won’t get the loss, but in the contrary, you will get the benefits and profits because Co.CC doesn’t ask a payment from you. You only need to place link or banner from Co.CC (with your referral link code) on your blog or website, and then let Dollars flow to your Paypalclip_image001.
So what keeps you waiting? Register yourself to Co.CC; click the banner below to join.
cocc
For those who have not yet had Paypal account, you can register freely as well; click the banner below to get your free account of Paypal.
 paypal
Happy hunting free dollars from Co.CC
Notes: You have no obligatory to use Co.CC domain for your blog, you can use it for any web. If you want to get your Paypal account but you don’t have credit card to verify, you can use Virtual Credit Card, to get this, just do googling.

Migrate your Blog from Blogger to WordPress


move from blogger to wordpressThe Goal: Your current blog at abc.blogspot.com is hosted on the Blogger platform but you now want to move this blog from Blogger to WordPress (self-hosted) with a personal domain name (say abc.com).
The Problem: WordPress.org provides an easy option to automatically import all your old blog posts and reader comments from Blogger into your new WordPress blog but there are still some bigger problems that are hard to ignore:
1. Some of your previous articles on the blogspot blog could be ranking very high in search engines for certain keywords but once you shift these articles to a new address, you might lose all that organic search traffic.
2. You cannot use a 301 redirect with Blogger to inform search engines that your site has permanently moved a new web address thus losing PageRank and other Google Juice.
3. Not just search bots, human beings who come to read your old articles via links from other sites won't know about the new location of those articles unless you manually insert the new links in each and every blogspot article (impossible for large blogs).
4. When you switch blogging platforms, existing blog readers who are subscribed to your Blogger RSS Feed may be lost forever if they don't manually update their RSS readers with your new WordPress feed address (and most won't).
5. When you lose RSS subscribers and search engines rankings, the pageviews will drop and that will seriously impact your AdSense revenue in case you are running Google ads.
The Solution: Now that you are aware of the various issues associated with moving sites from Blogger to WordPress, the very good news is that there exists a simple solution to deal with all these problems in one go.
You can quickly and safely migrate any blog from Blogger to WordPress without losing RSS Subscribers or human visitors and there's also a way to pass all that Google Juice from the old blogspot.com address to your new WordPress blog.

How to Move a Blog from Blogger to WordPress

Important: Before you implement anything, it may be a good idea to run through these steps on a dummy blog first. Also, backup your Blogger blog including the XML template, posts and comments just to be the safe side.
Step 1: In case you haven't done this already - register a new web domain, buy server space from some web hosting company* that offers PHP / MySQL hosting and and install WordPress software on your new domain.
*This site is hosted on Dreamhost.com but there are other good hosting options like GoDaddy, Blue Host, Media Temple and Knowhost - most services offer one-click WordPress installation so you don't need the help of a geek.
Step 2: Go to your WordPress Admin Dashboard -> Tools -> Import and select the Blogger option. Authorize WordPress to access your Google Account and within minutes, all your old blog posts and comments will be available on the new WordPress site.
Step 3: Copy this file into your WordPress themes directory and then rename the file from blogger.php.txt to blogger.php. You may use either Putty with wget or Web FTP to access your WordPress themes directory located on the web server. For credentials and other details, check your cPanel.
Here are the contents of that file.
<?php
 /*
  Template Name: blogger
 */

 global $wpdb;
 $old_url = $_GET['q'];

 if ($old_url != "") {
   $permalink = explode("blogspot.com", $old_url);

   $q = "SELECT guid FROM $wpdb->posts LEFT JOIN $wpdb->postmeta ".
        "ON ($wpdb->posts.ID = $wpdb->postmeta.post_id) WHERE ".
        "$wpdb->postmeta.meta_key='blogger_permalink' AND ".
        "$wpdb->postmeta.meta_value='$permalink[1]'";

  $new_url = $wpdb->get_var($q)? $wpdb->get_var($q) : "/";

  header ("HTTP/1.1 301 Moved Permanently");
  header("Location: $new_url");
 }
?>
Step 4. Open your WordPress dashboard and go to Pages -> Add New Page. Keep the title and URL of that page as blogger and select "blogger" from the Template drop-down. Save. There's no need to add any content to this page.
Step 5. Open the template generator, type the full address of your new WordPress blog (including http:// and the trailing slash) and this tool will create a new classic template for your blogspot blog that will look something like this.
<!DOCTYPE html PUBLIC "-//W3C//DTD XHTML 1.0 Strict//EN" "http://www.w3.org/TR/xhtml1/DTD/xhtml1-strict.dtd">
<html xmlns="http://www.w3.org/1999/xhtml" xml:lang="en" lang="en" dir="<$BlogLanguageDirection$>">
<head>
<title><$BlogPageTitle$></title>
<script type="text/javascript">
 <MainOrArchivePage>window.location.href='http://labnol.org/'</MainOrArchivePage>
 <Blogger><ItemPage>
   window.location.href='http://labnol.org/blogger/?q=<$BlogItemPermalinkURL$>'
 </ItemPage></Blogger>
</script>

<MainPage><link rel="canonical" href="http://labnol.org/" /></MainPage>
<Blogger><ItemPage>
 <link rel="canonical" href="http://labnol.org/blogger/?q=<$BlogItemPermalinkURL$>" />
</ItemPage></Blogger>
</head><body>

<div style="border:#ccc 1px solid; background:#eee; padding:20px; margin:80px;">
<p>This page has moved to a new address.</p>

<h1>
<MainOrArchivePage><a href="http://labnol.org"><$BlogTitle$></a></MainOrArchivePage>
<Blogger><ItemPage>
 <a href="http://labnol.org/blogger/?q=<$BlogItemPermalinkURL$>"><$BlogItemTitle$></a>
</ItemPage></Blogger>
</h1>
</div>
</body></html>

<!-- replace labnol.org with your WordPress site URL --->
Step 6. Open your Blogger Dashboard -> Layout -> Edit HTML and choose "Revert to Classic Blog". Copy-paste the template generated in Step 5 in the "Edit Template" area and click "Save Template Changes".
Your are done. Open any page on your old Blogger blog and it should redirect you to the corresponding WordPress page. On the WordPress side, since we are using a permanent 301 redirect with the redirection URLs, all the Google Juice will probably pass to your new WordPress pages with time.
Update your RSS Feed: When you move from Blogger to WordPress, the address of your RSS feed will change as well. Go to Blogger -> Settings -> Site Feed, type the address of your new WordPress RSS feed here and Google Reader, Bloglines, etc. will automatically move to your new feed. Check this FeedBurner FAQ for some more ideas.

Video Tutorial - Move from Blogspot to WordPress

Now that your new WordPress site is up and running with all the old Blogger posts, here are a few important things you should do:
1. Add your new WordPress site to Google Webmaster, verify ownership and and submit a Sitemap listing the URLs on your new site.
2. When you migrate from Blogger to WordPress, all your pictures and screenshot images hosted on Blogger / Picasa Web Albums will not get imported into WordPress. Therefore never delete your old blogger blog as it will break images that are now embedded in your WordPress posts.
3. Once the search bots and human beings start flocking to your new site,  you may update the homepage of your blogspot blog with links to some of your best posts.
4. To know how Googlebot will view your existing Blogspot blog, just turn off JavaScript in the browser and try visiting any of your old blog pages. It's a single link under H1 that points to your new address that internally does a 301 redirect.

Blogger9:- New blogger Host Your Own Domain Name on Blogger how read it.


When it comes to starting a blog, many people think either Blogger or WordPress.com. If you go for Blogger, your blog will be like this example:http://www.anilsingh.blogspot.com – something dot blogspot dot com. Similarly, WordPress blogs have names like http://www.anilsingh.wordpress.com/
Both blogging platforms are free, so one can try the excitement of blogging without having to spend any money. This is probably the cheapest hobby ever: free! Is it really? Well, after blogging for a while, you start seeing people linking to you, you make friends online, they link to your blog, then you participate in various contests or blog carnivals and again, people link to you. In fact, they don’t link to you, they link to Blogger. So, you start realizing that instead of giving away all this authority, you could own it. However, in order to benefit from that, you need to purchase your domain name. That’s about $11 per year for a .com domain name, so it’s still not too bad. Then you discover you need to buy hosting for your website. This adds a few USD per month, plus you need to be able to move your content from the free blogger blog to the self-hosted WordPress or whatever other CMS software you go for.
Blogger seized the opportunity and made a very smart move, allowing people to host their own domain names for free on blogger, without having to export any content and without needing to give up the blogger dashboard they’ve already been used to.
Hosting your custom domain name on blogger requires the following steps:
1. Find and buy a name. I use Godaddy.com for most of my domain names, but I have no idea if they are better than others. I like them because they have many discount coupon codes and because I have more than one domain name, so it all adds up when it comes to yearly renewals. If you wish to host your custom domain with Blogger, maybe it’s a good idea to buy the domain name from Blogger itself. In this case, you don’t need to read further, they will take care of setting it up for you.

2. Update the DNS servers
DNS stands for Domain Name system. Without entering too many technical details, it’s something that makes your website get displayed on the internet. In order to point your DNS servers to Blogger, you need to create a CNAME record for your domain name, associating it with ghs.google.com. Creating a CNAME record may differ from registrar to registrar, so you might want to check this with the company you bought your domain name from.
I’ll show you how to create a CNAME record with GoDaddy:
  • Log in your GoDaddy account
  • Click on View Domain Manager
  • Click on the domain name you want to create the CNAME for. This is what you’ll see:
How to set CNAME for Blogger hosting on GoDaddy
  • With the default DNS servers set (NS21.DOMAINCONTROL.COM and NS22.DOMAINCONTROL.COM), you’ll see under the DNS Manager tab that you have a link saying Launch. Click on it.
Attention: if during your domain name purchasing process you set up the DNS servers to point to something else than the default GoDaddy ones, you won’t see the DNS Manager launch link. If this is your case, you just need to set nameservers to default, then follow the steps in this tutorial.
CNAME and A Host setting tutorial GoDaddy
In this screen click on the second “Quick Add” button (which I marked with a red 1 on the image). A small table will open. In the first box, type www. In the second box, type ghs.google.com. The third box should show 1 Hour by default. If it doesn’t, choose 1 Hour from the drop down menu.
Attention: before doing this, check if you already have www somewhere in the CNAME table. If you do, GoDaddy won’t allow you to save a second entry for it, so you’ll have to edit the existing one. Editing it is simple: you just click on the text you want to change and you’ll be able to do it. Click on the @ and replace it with ghs.google.com.
  • In the A (Host) section of the table, you need to create A NAME records for your domain:
You’ll need to click on Quick Add and add four entries. In the first box of each entry, you need to type yourdomainname.com (whatever your domain name is), then in the second box, each of the following IP addresses:
216.239.32.21
216.239.34.21
216.239.36.21
216.239.38.21
  • Delete any other entry you might have in this section.
  • Click on the black Save Zone File button at the top of the screen. You’ll notice that your domain name has been replaced with an @ in all entries. It’s fine.
Now your DNS setup should be complete, but beware that changes need up to 48 hours to propagate, therefore you might need to wait for this time before your new setup becomes active.
3. Update your blog’s settings in Blogger:
  • In your blogger dashboard, go to Settings → Publishing
  • You will see a link that says Switch to Custom Domain. Click on it.
  • If you don’t have a domain name and you want to buy it from Blogger, enter your domain name in the box after http:// and click on Check Availability, then follow instructions.
  • If you already have a domain name, click on Switch to advanced settings.
  • Enter your domain name in the box after http://, like this www.yourdomainname.com. It won’t work without www.
  • Enter the Word verification and click on Save settings.
  • Check again the box which contains your domain name. Under it, you’ll see a line saying “Redirect yourdomainname.com to www.domainname.com. Tick the little square in front of this line, enter the Word verification again and click on Save settings.
Your custom domain name is now hosted on Blogger and the non-www version of the name is automatically redirected to the www. version.
Related Posts Plugin for WordPress, Blogger...